We’ve all had a leaky hose bib at least at one point in our lifetimes. Just when you thought things can’t be better (or worse), bam! Here comes a leaky hose bib to annoy you a little more. And then comes the fact that you now have to call the plumber and spend quite a bit of money to get your hose repaired. But you know what’s a good way to avoid all this? Fixing it, of course! How to fix a leaky hose bib? Let’s find out!
Hello and welcome to Turf Mechanic, where we try to find the solution for all your lawn related queries. In today’s article, we are going to take a look at how to fix a leaky hose bib. Naturally, there are several reasons why your hose might be “leaky” and we are going to take a look at quite a few of them.
This article is going to be fairly informative and a little technical at times (it’s still going to be fairly simple so don’t worry) so you better tell those hose bibs that you’re coming for them soon! Let’s get started!
What is a hose bib?
Now, one of the first things you might want to ask is what a hose bib really is. That’s a really good question. A hose bib is essentially a faucet. However, it’s just not any faucet, it’s a faucet located outside your house that’s specially intended for you to connect a hose with.
Naturally, you might be connecting your hose or the best sprinkler for you to the other end. However, whatever it’s connected to, you want it working properly for that equipment to run properly. So, fixing a leak when you find it becomes really urgent with your hose bib.
How to fix a leaky hose bib?
As I remarked earlier, there can be quite a few reasons as to why your hose bib is leaky. One of the first things that you might want to do is understand why it’s happening. We are going to take a look at how you can check out what the problem with your hose is.
Again, we are also going to take a look at the several kinds of problem that you might potentially face. Naturally, a discussion about how you might deal with each of them would also be done. So, once again, this article is going to be really informative and so we recommend you read it carefully till the very end.
The Basic Check
The basic check is the first thing you might want to do if you have a leak. You might have seen your plumber doing it and succeeding in fixing your leak within a few minutes. What you actually need to do is turn the water supply off and then tighten the faucet’s outermost nut with your hand.
In case it feels too stiff and you can’t do it with your bare hands, no worries. You can always use a pair of pliers to take care of it- turn it towards the right to tighten it (and alternatively, towards the left to loosen it). Once you have tightened it, turn on the water supply again.
Keep in mind: This method usually seems to work.
If it stops leaking, then there’s no problem! However, in case it doesn’t stop leaving you might move on to the other steps. Keep in mind that don’t put too much pressure on the bib while you’re trying this step out, because it can potentially damage your pipes. If your pipes are old, they can be really easily damaged, and that’s something you want to avoid at all costs.
Quoting AHS:
Tighten the packing nut. Use pliers or a wrench, and tighten the packing nut next to the faucet’s handle. Take care not to tighten the packing nut so much that the handle is hard to turn or you damage the fixture. Turn the water on and off, and if the dripping stops, nothing else needs to be done.
Changing the Packing Nut
Well, the second option is to actually change the packing nut. This one is a little more complex than the last one, but it isn’t too hard. Here are the steps that must be followed to do it properly:
- First of all, you want to turn off the water for this method. For the last method, turning off the water is optional to a certain extent. But unless you want a really hard time repairing and a really messy place, you’re better off turning the water off if you have to use this method.
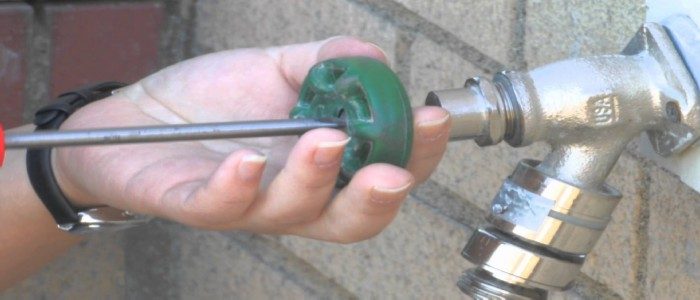
- Next, you might want to take off the handle assembly. Use your pliers to slowly turn the packing nut counterclockwise (towards the left) and keep doing it until you can remove the handle assembly.
- Remove the Packing Screw and Washer. This step is pretty self explanatory, all you have to do is take out the screw and pry out the washer with a screwdriver. Keep in mind that these can be taken to the plumbing story to get a proper replacement (in case you don’t know the size properly)
- Set up the new Packing Screw and Washer. Then you need to get hold of the right packing screw and washer and set it all up properly once again. The process is the same as when you took it out, just in the reverse.
- Put everything back together: Next, you might want to put everything back together. This sounds like something really hard, but it’s really simple, you just need to put the handle assembly back and tighten the packing nut once again, that’s all that there is to it!
- Turn on the water supply and check the status: Finally, you might want to turn on the water supply once again. Now, you can check the result of your work. If everything goes well, the leak should have stopped. If everything was done properly but it still didn’t stop, then you might want to call a professional after all.
When the hose bib is not shutting off all the way
Now, this is one of those cases you might have faced already. The hose bib sometimes just refuses to shut off properly! This one follows a method really similar to the basic method we mentioned earlier. Quoting The Spruce on the method:
- The first thing to do here is to shut off the water. You will remove the bonnet nut on the hose bib with pliers or a wrench. This may be easier if you remove the handle and the packing nut first but it is not always necessary. Unscrew the bonnet nut until the stem comes out. You can now see the washer at the bottom of the stem. Change this washer. You may need to bring the washer with you to the home improvement or hardware store so that you can easily match up the size. With the new washer installed tightly put the stem back and screw the bonnet nut back in. Then put the handle and packing nut back if you removed them. Turn the water back on and test for leaks.
- If the hose bib still leaks after replacing the washer then you may need to replace the hose bib.
Conclusion
At the end of the day, we can see that there are a few reasons why your hose might be leaking. However, all of these can be fixed, and you can do it yourself if you work hard enough.
Naturally, because you’re not a professional, there might be a few problems that you can’t solve yourself. But the common ones aren’t really that hard to solve, and you can actually take care of them yourself! All you need is the right spirit and the energy to make an effort!
Turf Mechanic is here for you!
Once again, you have stayed with us till the very end. We thank you for your time and we really hope that you could learn from today’s article. We really hope that you would be able to actually implement at least some of these ideas when it comes to your very own hose bib as well.
Of course, we understand that you might still have a few questions for us. If you do, please feel free to reach out to us here at Turf Mechanic and we will try our best to help you out. Please keep in mind that we are always here for you and we’re always eager to hear from you. So, please do not hesitate in reaching out to us if you have any queries that you think we might be able to help you with.
Once again, we thank you for giving us your valuable time. We hope to see you again on our next article, which would be coming around really soon!
Until then, you might consider reading some other articles here at Turf Mechanic! Here are a few to get you started: